Feeds:
Posts
Comments

By making the few changes to “My Basic Little Knitted Doll-Sally” PDF pattern Buy now you can have your own “Mei” doll from “My Neighbor Totoro”!

Using brown colored yarn. Make this change in the instructions for the hair.
Bring yarn around back and start to knit in the round on the (rs).
Rnd 1: KFB of each stitch, divide evenly over three dpn’s. (10sts)
Rnd 2: *KFB, k1; five times. (15sts)
Rnd’s 3-5: knit 15sts.
Bind off as if to purl.
Make two, sew to head.

Use 2 plies of the 4 ply brown colored hair yarn for her eyebrows.
And give her slightly larger eyes by making French knots with black worsted weight yarn.
Using a dark red color yarn give her an open mouth shape, placing it at a halfway point from the bottom of the nose to the bottom of the chin. Worked over a “three stitch by three row” area.
Give her a “two stitch by one row” Duplicate Stitch cheek blush.
And tie her pig tails with some pink yarn from the dress with two over hand knots decoratively placed on each tie.

Finish it off with the free corn pattern available as a download in the Box Net widget to the right.

See more information in the “Knit Amigurumi Patterns” Page.

Knit beaded balls


BeadBalls Group One

Originally uploaded by judy.goofygals

Add beads to your knitting. String size 8 seed beads onto DK or light worsted yarn or size 11 seed beads onto fingering weight yarn.
You can get a single strand of yarn to fit a small sized hole by using a “DIY” yarn needle.

This is a video of how to do a stitch pattern and it’s mirror from my “Japanese Knitting Decorder Disc-two. This disc contains more advanced stitch patterns than the basic disc. It will soon be available in my Etsy shop. I’m waiting to post more video explanations before offering it for sale.

Stitch Over


Stitch Over

Originally uploaded by judy.goofygals

This is a video of how to do one of the symbols from my “Japanese Knitting Decorder Disc-One”. This disc is available in my Etsy shop.
www.goofygals.etsy. com

3043425351_3a5dd820ca

Most patterns instruct you to make single thickness straps for your bag handles. I find that making cords and tubes with a length of  ribbon or cord inserted down the center keeps them from growing longer with use.

Cut a length of ribbon the 12-16″ longer than the finished length. Work your knitted or crochet cord for about one inch. Insert a ribbon end into the middle of the cord, exiting out the start end. Tie a knot at this end (this will keep the ribbon from pulling out as you work) leaving about a 6 to 8 inch tail. Continue working the cord around the ribbon to the desired length. After binding off the cord tie a knot in the ribbon at this end right next to bind off  leaving about a 6 to 8 inch tail.

After attaching the cord to the main body of the piece tack the ribbon tails to the main body and knot two to three times. Finish off the ribbon’s raw cut edge by cutting the end at a 45 degree angle and applying “Fray Check” or “Aleene’s OK To Wash-It” glue to seal the raw edges for non-dry cleaned pieces.

TIP: Choose a ribbon color close to the cord color. And if you’re planning on washing the piece use washable ribbon and pre-shrink if necessary.

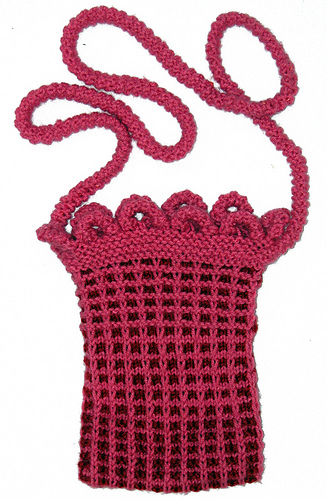
For the cord strap on ” Mosaic Purse” I knitted a 5 stitches garter stitch I-cord with 1/4 inch polyester ribbon inserted through the center.

Working wide straps “in the round” creates stronger, sturdier, slightly padded handles. Cut ribbon 4-6 inches longer than the finished length and about 1/4″ narrower than the width of the strap. Mark the finished length on the ribbon, leaving 2-3″ at each end, set aside. Work the strap for about one inch. Insert the ribbon end into the middle of the strap, exiting out the start end for about 2-3″. With a safety pin secure the ribbon and strap this will keep the ribbon from pulling out. Continue working the strap around the ribbon to the desired length. After binding off the strap hand sew the ribbon ends to the strap ends using a back stitch or stitching twice. There will be a lot of stress at these points. You can seal the raw edges as described above and turn under to insert flush with the strap ends.

Tips: You can sew flat tubes from fabric to use for the strap inserts.


Left/Right Increase

Originally uploaded by judy.goofygals

This is a video of how to do one of the symbols from my Japanese Knitting Decoder Disc-One. This disc is available in my Etsy shop at www.goofygals.etsy.com.


Knit in Row Below

Originally uploaded by judy.goofygals

This is a video of how to do one of the symbols from my “Japanese Knitting Decorder Disc-One”. This disc is available in my Etsy shop at www.goofygals.etsy.com.


scallopSock

Originally uploaded by judy.goofygals

By converting written stitch pattern instructions into Japanese charted symbol instructions you’ll get the visual information needed to knit the stitch patterns “in the round”.

I used a “Scallop Pattern” from one of my stitch source books to make the cuff on my “toe up sox”.
I started with the garter ridge to frame the pattern and ended with six rows of 1 x1 ribbing casting off with a stretchy bind off while adding in bobbles.
Note: Next time I’m using one size larger needle for the “Scallop Pattern”, then back to the original needle for the ribbing and bobbles.

For those of you who have taken my “Japanese Knitting Pattern Basics” class, use the “Chart Symbols Disc-1” to convert simple stitch patterns into Japanese charted symbol instructions.
Pick a pattern that has either all knit or all purl stitches for the even number rows to start, it’s easier.
Enter odd numbered row information from right to left onto the graph.
Enter even numbered row “reversed” information from left to right onto the graph. (if it says purl make it knit and vice versa).
Chart out at least two repeats for multiples above five.
You will easily see the “multiples of (x) number of sts” sequence, the “+ (x) number of st(s)” placement and the row patterns.

Since Japanese charted symbols are a description of the stitch pattern as seen from the right-side (as if you are looking at the finished fabric), you can read all the rows right to left when knitting “in the round”.*

Cast on or work over a number that is divisible by the “multiple of (x) number of sts”.
For example: “multiple of 13 sts” cast on or work over 39, 52, 65, 78, 91sts, etc. When working “in the round” don’t cast on the “+ (x) number stitches” and ignore them on the chart when knitting. Just keep repeating the “multiple of (x) number of sts” sequence (the stitches between the green lines on my graphed charts).

Once you “get” the process, you can attempt to graph more complex stitch patterns with 16 + rows, yo’s, increases and decreases etc. in the even numbered rows! My next project is to attempt to graph asymmetrical stitch patterns.

*Remember when knitting “flat” from a Japanese knitting chart all the odd number rows are read right to left, and all the even number rows are read left to right while knitting the opposite of what the stitch is. For example: to make a stockinette stitch pattern (all knit symbols on a chart) you have to purl the even number rows to make them appear as knits on the right-side.

Yarn Over Twice


Yarn Over Twice

Originally uploaded by judy.goofygals

This is a video of how to do one of the symbols from my Japanese Knitting Decorder Disc-one. This disc is available in my Etsy shop at www.goofygals.etsy.com

Over Increase


Over Increase

Originally uploaded by judy.goofygals

This is a video of how to do one of the symbols from my Japanese Knitting Decorder Disc-One. This disc is available in my Etsy shop at www.goofygals.etsy.com.